


Table of contents
This is part 3 of the tutorial series where we build a metaverse from scratch. In the last part, we did a lot of Web3-related things: We enabled wallet connection on our website, we created and deployed an NFT collection, we included the NFT's 3D model stored on IPFS in our world and we implemented a toolbar showing all NFTs the player owns. If you haven't seen the first two parts of the series I would advise you to pause here and check them out before you continue reading.
Part 1: How to create a 3D metaverse in React (part 1/3)
Part 2: How to create a 3D metaverse in React (part 2/3)
In this, the final part of the series, we are going to add NPC interaction to our world and make minting possible. Additionally, we'll add user feedback corresponding to the transaction status. Let's go!
Add a crosshair and make NPC interactable
The next step is to make the vendor in our metaverse interactable. We want a speech bubble to appear when we hover over the vendor and are not too far away from the vendor. But right now it's quite hard to tell if we are focusing on the vendor or not.
So let's add a crosshair as a HUD element.
Crosshair
Create a new file called Crosshair.tsx with the following code:
export const Crosshair = () => {
return (
<div className="fixed top-1/2 left-1/2 -translate-x-1/2 -translate-y-1/2 text-gray-300 text-3xl">
⚬
</div>
);
};
That's all we need in order to position a small circle in the middle of the screen.
Now navigate to the HUD.tsx file and include the crosshair in the return statement. The file should now look like this:
import { Crosshair } from './Crosshair';
import { Toolbar, ToolbarItem } from './Toolbar';
import { useNFTs } from '@/hooks/useNFTs';

export const HUD = () => {
  const { tokens } = useNFTs();

  const toolbarItems: ToolbarItem[] = tokens.map((token) => ({
    id: token.id.toString(),
    name: token.name,
    thumbnailURL: token.imageURL,
  }));

  return (
    <>
      <Crosshair />
      <Toolbar items={toolbarItems} />
    </>
  );
};
Voilá, we have a crosshair in our 3D experience.
Speech bubble
Next up let's create a speech bubble on top of the vendor's head. Create a new component called SpeechBubble under src/components/. The speech bubble component uses the Html component of the drei library. With the help of this component we can easily embed normal HTML elements in our experience. If we look/move around drei takes care of moving/scaling the HTML elements accordingly by using CSS transformations. Define the import statement at the top of the file:
import { Html } from "@react-three/drei"
Next, use the Html component in the return statement of the SpeechBubble component like so:
return (
  <Html
    className="bg-white/40 backdrop-blur-md p-4 rounded-md rounded-bl-none shadow-md w-52 text-gray-800 text-sm"
    position={position}
    distanceFactor={4}
    wrapperClass="origin-bottom-left !z-0"
  >
    Hello there!
  </Html>
);
In this code we apply some CSS to the HTML element that will be embedded in our experience using the className and wrapperClass props. Additionally, we pass down a position variable that is yet to be defined and set the distanceFactor to 4. The distanceFactor is responsible for scaling the HTML element depending on the distance between the camera and the embedded HTML element. A value of 4 is going to work well in our case.
Now, it would be nice to receive the position as a prop so that the parent component of the speech bubble is able to control the position. That way we could possibly reuse the speech bubble component in different places in our 3D world. So let's change the component code accordingly:
import { Html } from '@react-three/drei';

type Props = {
  position: [number, number, number];
};

const SpeechBubble = ({ position }: Props) => {
  return (
    <Html
      className="bg-white/40 backdrop-blur-md p-4 rounded-md rounded-bl-none shadow-md w-52 text-gray-800 text-sm"
      position={position}
      distanceFactor={4}
      wrapperClass="origin-bottom-left !z-0"
    >
      Hello there!
    </Html>
  );
};

export default SpeechBubble;
Great! Now, let's add the speech bubble to the 3D world. Since we want our speech bubble to be positioned relative to the vendor's model which is defined inside AdvancedCharacter.tsx we could use the SpeechBubble component in there. But instead of using it directly in the AdvancedCharacter component we can pass our speech bubble as children making the code more reusable. Inside Vendor.tsx import SpeechBubble from ./SpeechBubble and pass the SpeechBubble component as children to the AdvancedCharacter component.
<AdvancedCharacter
  scale={0.08}
  rotation={[0, -0.1, 0]}
  position={[0.7508242325314055, 0, -0.9590807472709626]}
>
  <SpeechBubble position={[2.54, 21.54, 2.2]} />
</AdvancedCharacter>;
The position places the speech bubble to the top right of the vendor.
As of now AdvancedCharacter does not use the children prop in any way. Change the return statement so that the children prop is used:
return (
  <group {...props} dispose={null}>
    <mesh
      castShadow
      receiveShadow
      geometry={nodes.Body1.geometry}
      material={material}
    />
    <mesh
      castShadow
      receiveShadow
      geometry={nodes.Head1.geometry}
      material={material}
    />
    <mesh
      castShadow
      receiveShadow
      geometry={nodes.ArmLeft1.geometry}
      material={material}
    />
    <mesh
      castShadow
      receiveShadow
      geometry={nodes.ArmRight1.geometry}
      material={material}
    />
    <mesh
      castShadow
      receiveShadow
      geometry={nodes.LegLeft1.geometry}
      material={material}
    />
    <mesh
      castShadow
      receiveShadow
      geometry={nodes.LegRight1.geometry}
      material={material}
    />
    {props.children}
  </group>
);
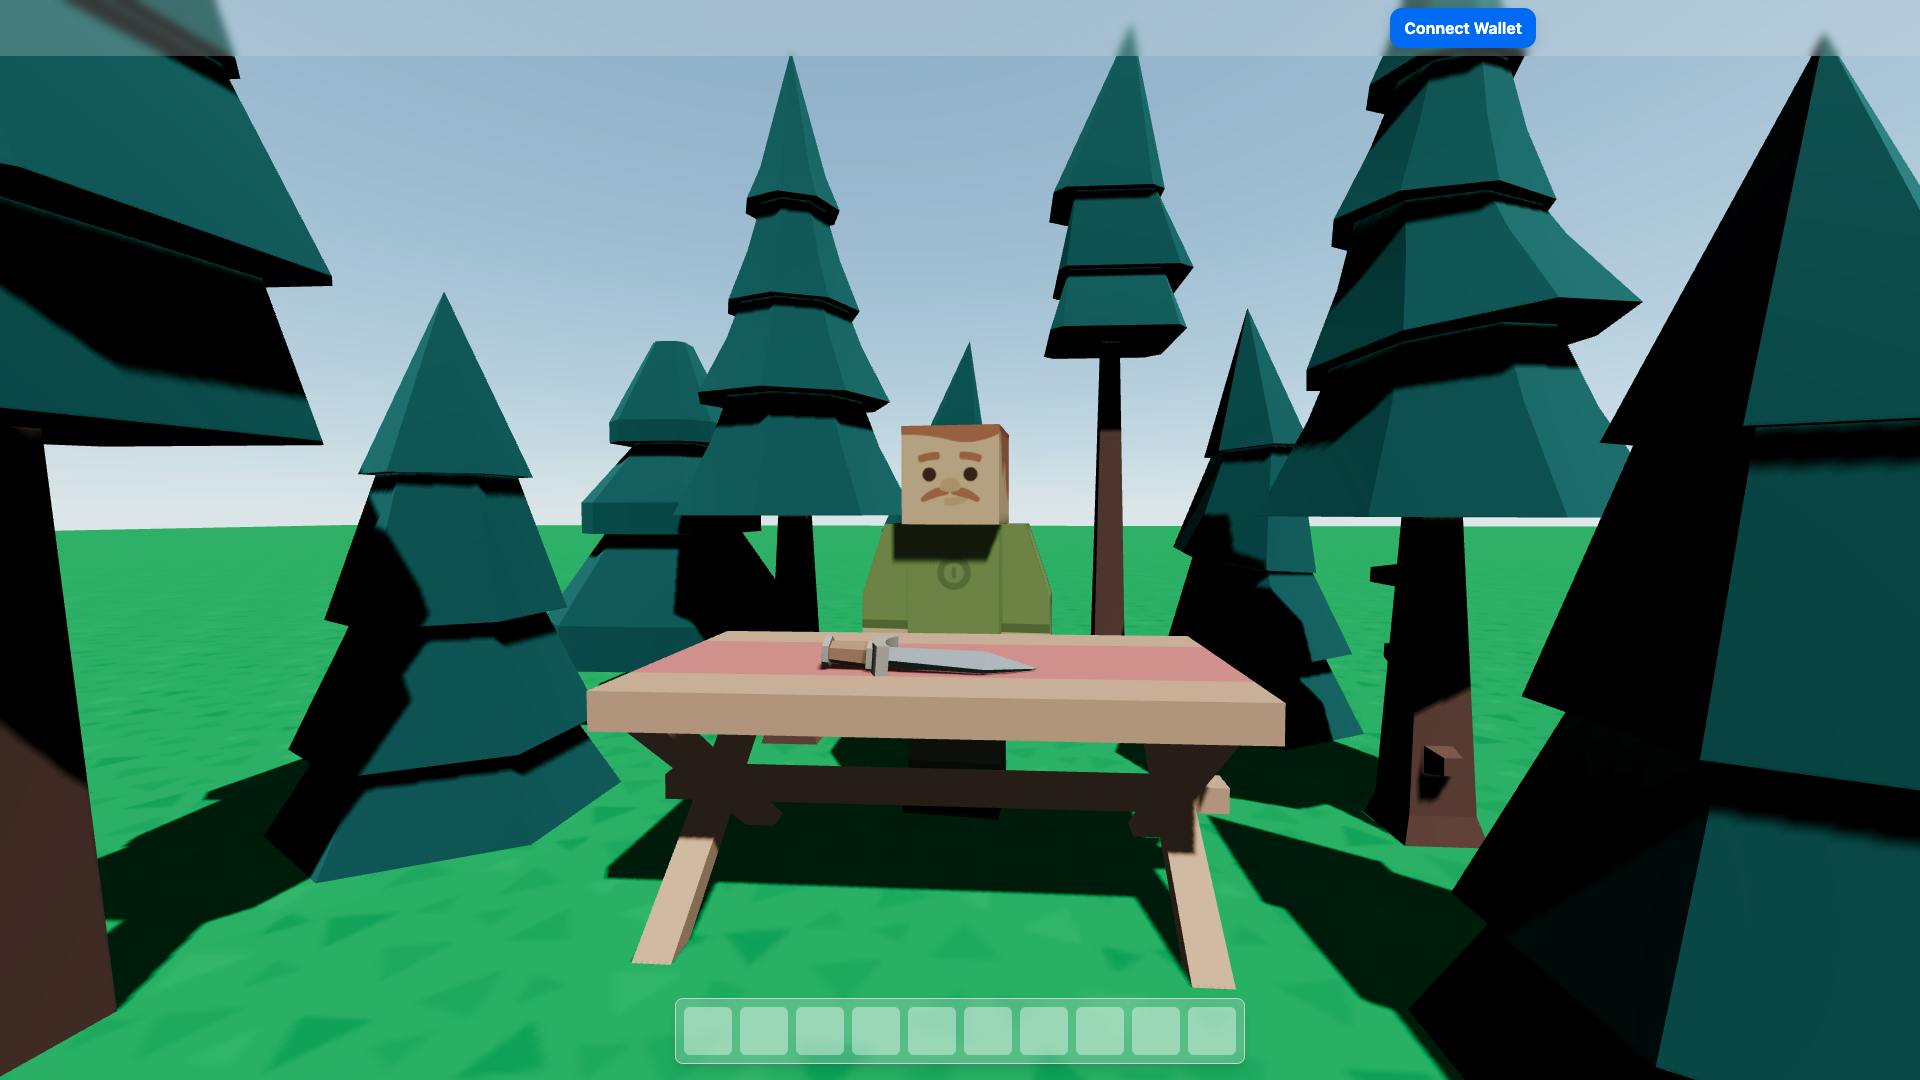
Cool, if you check your browser now you should see the following:
Now let's make this speech bubble appear conditionally instead of being there all the time.
Conditionally showing the speech bubble
Let's start by only showing the speech bubble if we hover over the vendor with our pointer. Inside Vendor.tsx import useState from react and add a new stateful variable at the top of the component.
const [isHovered, setIsHovered] = useState(false);
Then, add the props onPointerOver and onPointerOut to the AdvancedCharacter component like so:
<AdvancedCharacter
  scale={0.08}
  rotation={[0, -0.1, 0]}
  position={[0.7508242325314055, 0, -0.9590807472709626]}
  onPointerOver={onPointerOver}
  onPointerOut={onPointerOut}
>
  <SpeechBubble position={[2.54, 21.54, 2.2]} />
</AdvancedCharacter>;
Now let's define the functions in our component code.
const onPointerOver = () => {
  setIsHovered(true);
};

const onPointerOut = () => {
  setIsHovered(false);
};
Lastly, only show the SpeechBubble component when isHovered is true.
<AdvancedCharacter
  scale={0.08}
  rotation={[0, -0.1, 0]}
  position={[0.7508242325314055, 0, -0.9590807472709626]}
  onPointerOver={onPointerOver}
  onPointerOut={onPointerOut}
>
  {isHovered && <SpeechBubble position={[2.54, 21.54, 2.2]} />}
</AdvancedCharacter>
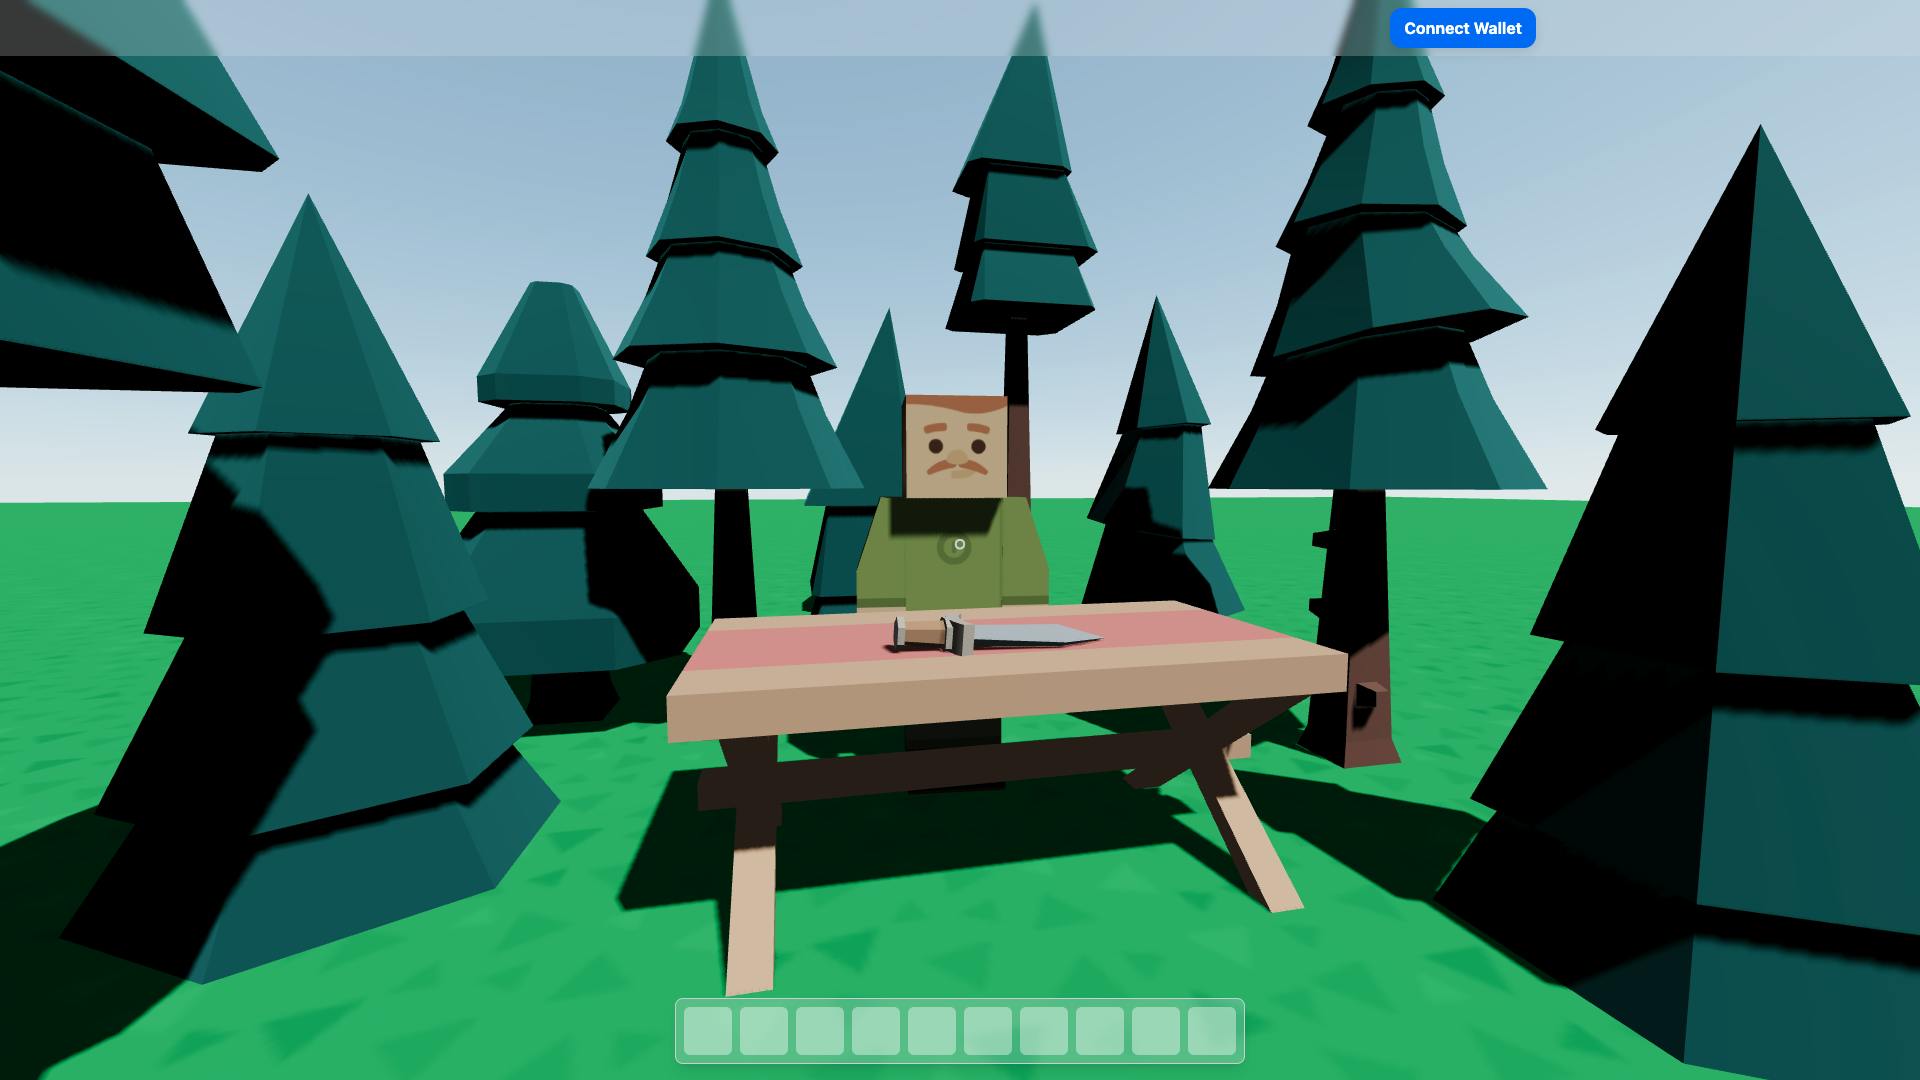
That's all. Checking your browser you should see that the speech bubble is only visible when you hover over the vendor.
Next, we want to calculate the distance between the camera (the player) and the vendor. Let's start by getting a reference to the model of the vendor. Inside AdvancedCharacter.tsx import forwardRef form react and change how the Model component is declared.
export const Model = forwardRef<THREE.Group, JSX.IntrinsicElements['group']>(
  (props, ref) => {
    // ...
  }
);
Add a displayName at the bottom of the file. This helps to show the correct name of the component whilst debugging and is only necessary for components with forwarded refs.
Model.displayName = 'Model';
Now, add the ref to the group element.
return (
  <group {...props} dispose={null} ref={ref}>
    {/** ... */}
  </group>
);
The entire file should now look something like this:
/*
Auto-generated by: https://github.com/pmndrs/gltfjsx
Command: npx gltfjsx@6.2.3 public/assets/models/advancedCharacter.gltf -o src/components/AdvancedCharacter.tsx -t -s -r public
*/

import * as THREE from 'three';
import React, { forwardRef, useRef } from 'react';
import { useGLTF } from '@react-three/drei';
import { GLTF } from 'three-stdlib';
import { useTexture } from '@react-three/drei';

type GLTFResult = GLTF & {
  nodes: {
    Body1: THREE.Mesh;
    Head1: THREE.Mesh;
    ArmLeft1: THREE.Mesh;
    ArmRight1: THREE.Mesh;
    LegLeft1: THREE.Mesh;
    LegRight1: THREE.Mesh;
  };
  materials: {
    lambert1: THREE.MeshStandardMaterial;
  };
};

export const Model = forwardRef<THREE.Group, JSX.IntrinsicElements['group']>(
  (props, ref) => {
    const { nodes } = useGLTF(
      '/assets/models/advancedCharacter.gltf'
    ) as GLTFResult;

    const texture = useTexture('/assets/textures/skin_manAlternative.png');
    texture.flipY = false;
    texture.colorSpace = THREE.SRGBColorSpace;

    const material = new THREE.MeshStandardMaterial({
      map: texture,
    });

    return (
      <group {...props} dispose={null} ref={ref}>
        <mesh
          castShadow
          receiveShadow
          geometry={nodes.Body1.geometry}
          material={material}
        />
        <mesh
          castShadow
          receiveShadow
          geometry={nodes.Head1.geometry}
          material={material}
        />
        <mesh
          castShadow
          receiveShadow
          geometry={nodes.ArmLeft1.geometry}
          material={material}
        />
        <mesh
          castShadow
          receiveShadow
          geometry={nodes.ArmRight1.geometry}
          material={material}
        />
        <mesh
          castShadow
          receiveShadow
          geometry={nodes.LegLeft1.geometry}
          material={material}
        />
        <mesh
          castShadow
          receiveShadow
          geometry={nodes.LegRight1.geometry}
          material={material}
        />
        {props.children}
      </group>
    );
  }
);

Model.displayName = 'Model';

useGLTF.preload('/assets/models/advancedCharacter.gltf');
Head back to Vendor.tsx. Import useRef from react and use it inside your component code like so:
const advancedCharacterRef = useRef<THREE.Group>(null);
Add a ref property to the component setting its value to our newly created reference.
<AdvancedCharacter
  scale={0.08}
  rotation={[0, -0.1, 0]}
  position={[0.7508242325314055, 0, -0.9590807472709626]}
  onPointerOver={onPointerOver}
  onPointerOut={onPointerOut}
  ref={advancedCharacterRef}
>
  {isHovered && <SpeechBubble position={[2.54, 21.54, 2.2]} />}
</AdvancedCharacter>;
With that, we have our reference to the group element of the AdvancedCharacter component.
Next, let's get our camera instance and calculate the distance between the camera and the vendor. Add a few new import statements at the top of the file.
import * as THREE from 'three';
import { useThree } from '@react-three/fiber';
Now, use the hook at the top of the component logic.
const { camera } = useThree();
Create a new stateful variable storing the distance between the camera and the vendor.
const [distanceToCamera, setDistanceToCamera] = useState(0);
Now define a new function called getDistanceToCamera. The function takes our AdvancedCharacter model which is of type THREE.Group, calculates the distance between the camera and that model and returns it.
const getDistanceToCamera = (advancedCharacter: THREE.Group) => {
  const cameraPosition = new THREE.Vector3();
  camera.getWorldPosition(cameraPosition);
  const distance = cameraPosition.distanceTo(advancedCharacter.position);
  return distance;
};
Let's now create a function updateDistanceToCamera which calls getDistanceToCamera, passes the vendor model as an argument and sets our stateful variable distanceToCamera to that return value.
const updateDistanceToCamera = () => {
  const advancedCharacter = advancedCharacterRef.current;
  if (!advancedCharacter)
    throw new Error('Ref for advanced character is not set');

  const distance = getDistanceToCamera(advancedCharacter);
  setDistanceToCamera(distance);
};
Next, we want to call that method on every frame. Therefore, let's import the useFrame hook from @react-three/fiber and use it.
useFrame(() => {
  updateDistanceToCamera();
});
Lastly, let's only show the SpeechBubble component if we are close to the vendor. A value like 3.5 works well.
<AdvancedCharacter
  scale={0.08}
  rotation={[0, -0.1, 0]}
  position={[0.7508242325314055, 0, -0.9590807472709626]}
  onPointerOver={onPointerOver}
  onPointerOut={onPointerOut}
  ref={advancedCharacterRef}
>
  {isHovered && distanceToCamera < 3.5 && (
    <SpeechBubble position={[2.54, 21.54, 2.2]} />
  )}
</AdvancedCharacter>
Great, that should be all. Now the speech bubble is only visible when we hover over the vendor and are not further away than 3.5 units.
Right now, we update our distance on every frame. However, we don't move the player on every frame leading to unnecessary computation. How about we only update the distance when we are pressing one of the movement buttons? Add the following two import statements to Vendor.tsx.
import { useKeyboardControls } from '@react-three/drei';
import { Controls } from '@/app/page';
Then, use the hook in the component logic.
const [, getKeyboardControls] = useKeyboardControls<Controls>();
Lastly, let's only call the updateDistanceToCamera function inside useFrame if a button is pressed.
useFrame(() => {
  const { forward, backward, left, right } = getKeyboardControls();
  if (forward || backward || left || right) {
    updateDistanceToCamera();
  }
});
Nice, with that we improved the performance of our game a bit.
The entire Vendor.tsx file should now have content similar to this:
import { Model as AdvancedCharacter } from './AdvancedCharacter';
import SpeechBubble from './SpeechBubble';
import { useRef, useState } from 'react';
import { useFrame, useThree } from '@react-three/fiber';
import * as THREE from 'three';
import { useKeyboardControls } from '@react-three/drei';
import { Controls } from '@/app/page';

export const Vendor = () => {
  const [isHovered, setIsHovered] = useState(false);
  const [distanceToCamera, setDistanceToCamera] = useState(0);
  const { camera } = useThree();
  const advancedCharacterRef = useRef<THREE.Group>(null);
  const [, getKeyboardControls] = useKeyboardControls<Controls>();

  useFrame(() => {
    const { forward, backward, left, right } = getKeyboardControls();
    if (forward || backward || left || right) {
      updateDistanceToCamera();
    }
  });

  const onPointerOver = () => {
    setIsHovered(true);
  };

  const onPointerOut = () => {
    setIsHovered(false);
  };

  const updateDistanceToCamera = () => {
    const advancedCharacter = advancedCharacterRef.current;
    if (!advancedCharacter)
      throw new Error('Ref for advanced character is not set');

    const distance = getDistanceToCamera(advancedCharacter);
    setDistanceToCamera(distance);
  };

  const getDistanceToCamera = (advancedCharacter: THREE.Group) => {
    const cameraPosition = new THREE.Vector3();
    camera.getWorldPosition(cameraPosition);
    const distance = cameraPosition.distanceTo(advancedCharacter.position);
    return distance;
  };

  return (
    <AdvancedCharacter
      scale={0.08}
      rotation={[0, -0.1, 0]}
      position={[0.7508242325314055, 0, -0.9590807472709626]}
      onPointerOver={onPointerOver}
      onPointerOut={onPointerOut}
      ref={advancedCharacterRef}
    >
      {isHovered && distanceToCamera < 3.5 && (
        <SpeechBubble position={[2.54, 21.54, 2.2]} />
      )}
    </AdvancedCharacter>
  );
};
Enable interaction with the vendor
Let's make interacting with the vendor possible. For that, we want to know when the user presses the e key. Right now we only have event listeners related to movement set up so head over to page.tsx under src/app/ and add a new string literal type to the type union.
export type Controls = 'forward' | 'backward' | 'left' | 'right' | 'interact';
Next, change the map array which defines which keyboard events we want to listen to.
const map: KeyboardControlsEntry<Controls>[] = [
  { name: 'forward', keys: ['ArrowUp', 'KeyW'] },
  { name: 'backward', keys: ['ArrowDown', 'KeyS'] },
  { name: 'left', keys: ['ArrowLeft', 'KeyA'] },
  { name: 'right', keys: ['ArrowRight', 'KeyD'] },
  { name: 'interact', keys: ['KeyE'] },
];
Now, head over to Vendor.tsx and change the way we destructure the return value of useKeyboardControls.
const [subscribeToKeyboardEvents, getKeyboardControls] = useKeyboardControls<Controls>();
Next, import useEffect from react. Call useEffect and invoke subscribeToKeyboardEvents inside the effect passing it two callbacks. The first one is used to define which keyboard event we want to listen to. The second callback provides us with a boolean defining if the button is pressed or not.
useEffect(() => {
  return subscribeToKeyboardEvents(
    (state) => state.interact,
    (isPressed) => {
      if (isPressed) {
        // Do something
      }
    }
  );
}, [subscribeToKeyboardEvents]);
The return value of subscribeToKeyboardEvents is a function which unsubscribes from the keyboard event so we don't have to do that ourselves.
Now, let's restrict when we actually need to call the subscribeToKeyboardEvents function. We only want interaction with the vendor to be possible when:
The user is connected to the website with his wallet
The player is hovering over the vendor
The player is in proximity to the vendor
Import useAccount from wagmi.
import { useAccount } from 'wagmi';
Then, use the hook like so:
const { isConnected } = useAccount();
Add isConnected, isHovered, distanceToCamera to the dependency array of useEffect and return from useEffect immediately if any of the requirements is false.
useEffect(() => {
  if (!isConnected || !isHovered || distanceToCamera >= 3.5) return;

  return subscribeToKeyboardEvents(
    (state) => state.interact,
    (isPressed) => {
      if (isPressed) {
        // Do something
      }
    }
  );
}, [subscribeToKeyboardEvents, isConnected, isHovered, distanceToCamera]);
With that, we have the trigger for the vendor interaction set up. Next, let's define the minting logic and execute it when the player interacts with the vendor.
Implement minting functionality and trigger it on NPC interaction
Let's create a new custom hook which defines the logic necessary for minting. Add a new file to src/hooks/ called useMint.ts. Inside useMint.ts let's start by defining a new string literal type union for the different statuses available during the mint process.
export type TransactionStatus =
  | 'idle'
  | 'confirming'
  | 'minting'
  | 'error'
  | 'success';
Now, at the top of the page import what we'll need for minting and keeping track of the transaction status.
import { abi } from '@/utils/abis/ditem';
import { useState, useEffect } from 'react';
import { parseEther } from 'viem';
import {
  usePrepareContractWrite,
  useContractWrite,
  useWaitForTransaction,
} from 'wagmi';
Next, create the actual hook useMint. Inside the hook call the wagmi hook usePrepareContractWrite passing it the data necessary to call the publicMint function on our smart contract. This includes the arguments args which in our case consist of only one defining the number of tokens we want to mint. This also includes the amount it should cost value to invoke that function.
export const useMint = () => {
  const {
    config,
    error: prepareError,
    isError: isPrepareError,
  } = usePrepareContractWrite({
    address: process.env.NEXT_PUBLIC_CONTRACT_ADDRESS as `0x${string}`,
    abi,
    functionName: 'publicMint',
    args: [BigInt(1)],
    // Heymint takes 0.1 MATIC on each mint as a fee + the price for the NFT (0.0001 MATIC)
    value: parseEther('0.1001'),
  });
};
What's being returned here is a config object necessary for the next hook as well as an error object and a boolean isError for error handling and user feedback.
Next, use the useContractWrite hook from wagmi providing the config object that has been returned before as an argument.
const { data, error, isError, write } = useContractWrite(config);
The hook returns a write function to actually invoke the publicMint function on our smart contract, a data object which, once a transaction is made, keeps transaction data and an error object as well as an isError boolean for error handling and user feedback.
Next, we need one more hook useWaitForTransaction and pass it the transaction hash or undefined if no transaction has been started yet.
const { isLoading, isSuccess } = useWaitForTransaction({
  hash: data?.hash,
});
This hook returns more status information regarding the transaction.
Now, create a stateful variable to store the transaction status.
const [transactionStatus, setTransactionStatus] =
  useState<TransactionStatus>('idle');
Next, let's use the useEffect hook to update the transaction status depending on the status information that are being returned to us by the wagmi hooks.
useEffect(() => {
  if (isLoading) {
    setTransactionStatus('minting');
  } else if (isSuccess) {
    setTransactionStatus('success');
  } else if (isPrepareError || isError) {
    console.error((prepareError || error)?.message);
    setTransactionStatus('error');
  }
}, [isLoading, isSuccess, isPrepareError, isError, error, prepareError]);
So far so good! However, if the user disconnects from the website we don't update the status accordingly. Let's add one more effect which resets the status once the user disconnects his wallet. For that import the hook useAccount from wagmi. Then, call the hook in useMint.
const { isConnected } = useAccount();
Next, add the following useEffect:
useEffect(() => {
  // When a user disconnects the state should be reset
  if (!isConnected && transactionStatus !== 'idle') {
    setTransactionStatus('idle');
  }
}, [isConnected, transactionStatus]);
Amazing, we're nearly done with the hook. All that's left to do is to return something from useMint.
return {
  transactionStatus,
  setTransactionStatus,
  mint: write,
};
In addition to returning the transaction status we are also returning its setter function setTransactionStatus because we need to be able to change the status from outside the hook as well.
The entire file should now look something like this:
import { abi } from '@/utils/abis/ditem';
import { useState, useEffect } from 'react';
import { parseEther } from 'viem';
import {
  usePrepareContractWrite,
  useContractWrite,
  useWaitForTransaction,
  useAccount,
} from 'wagmi';

export type TransactionStatus =
  | 'idle'
  | 'confirming'
  | 'minting'
  | 'error'
  | 'success';

export const useMint = () => {
  const {
    config,
    error: prepareError,
    isError: isPrepareError,
  } = usePrepareContractWrite({
    address: process.env.NEXT_PUBLIC_CONTRACT_ADDRESS as `0x${string}`,
    abi,
    functionName: 'publicMint',
    args: [BigInt(1)],
    // Heymint takes 0.1 MATIC on each mint as a fee + the price for the NFT (0.0001 MATIC)
    value: parseEther('0.1001'),
  });
  const { data, error, isError, write } = useContractWrite(config);
  const { isLoading, isSuccess } = useWaitForTransaction({
    hash: data?.hash,
  });
  const [transactionStatus, setTransactionStatus] =
    useState<TransactionStatus>('idle');
  const { isConnected } = useAccount();

  useEffect(() => {
    if (isLoading) {
      setTransactionStatus('minting');
    } else if (isSuccess) {
      setTransactionStatus('success');
    } else if (isPrepareError || isError) {
      console.error((prepareError || error)?.message);
      setTransactionStatus('error');
    }
  }, [isLoading, isSuccess, isPrepareError, isError, error, prepareError]);

  useEffect(() => {
    // When a user disconnects the state should be reset
    if (!isConnected && transactionStatus !== 'idle') {
      setTransactionStatus('idle');
    }
  }, [isConnected, transactionStatus]);

  return {
    transactionStatus,
    setTransactionStatus,
    mint: write,
  };
};
Let's now call the mint function on vendor interaction. Inside Vendor.tsx import useMint from @/hooks/useMint and call the hook inside the component like this:
const { transactionStatus, setTransactionStatus, mint } = useMint();
Now, let's revisit useEffect. Replace the placeholder // Do something inside the callback function that is being passed to subscribeToKeyboardEvents with the following:
useEffect(() => {
  if (!isConnected || !isHovered || distanceToCamera >= 3.5) return;

  return subscribeToKeyboardEvents(
    (state) => state.interact,
    (isPressed) => {
      if (isPressed) {
        if (mint) {
          mint();
          setTransactionStatus('confirming');
        }
      }
    }
  );
}, [
  subscribeToKeyboardEvents,
  isConnected,
  isHovered,
  distanceToCamera,
  mint,
  setTransactionStatus,
]);
Don't forget to add mint and setTransactionStatus to the dependency array. The new addition to the useEffect triggers the minting process and sets the transaction status to confirming.
There is still one undesirable behaviour. If the minting process is still running the user can trigger the minting function once again leading to a second transaction (considering a wallet is connected, the player hovers over the vendor and is close to him). So let's further restrict when we want to be listening to keyboard events. Let's return early from the useEffect if the transaction status is confirming or minting.
useEffect(() => {
  if (
    !isConnected ||
    !isHovered ||
    distanceToCamera >= 3.5 ||
    transactionStatus === 'confirming' ||
    transactionStatus === 'minting'
  )
    return;

  return subscribeToKeyboardEvents(
    (state) => state.interact,
    (isPressed) => {
      if (isPressed) {
        if (mint) {
          mint();
          setTransactionStatus('confirming');
        }
      }
    }
  );
}, [
  subscribeToKeyboardEvents,
  isConnected,
  isHovered,
  distanceToCamera,
  mint,
  setTransactionStatus,
  transactionStatus,
]);
Remember to add transactionStatus to the dependency array.
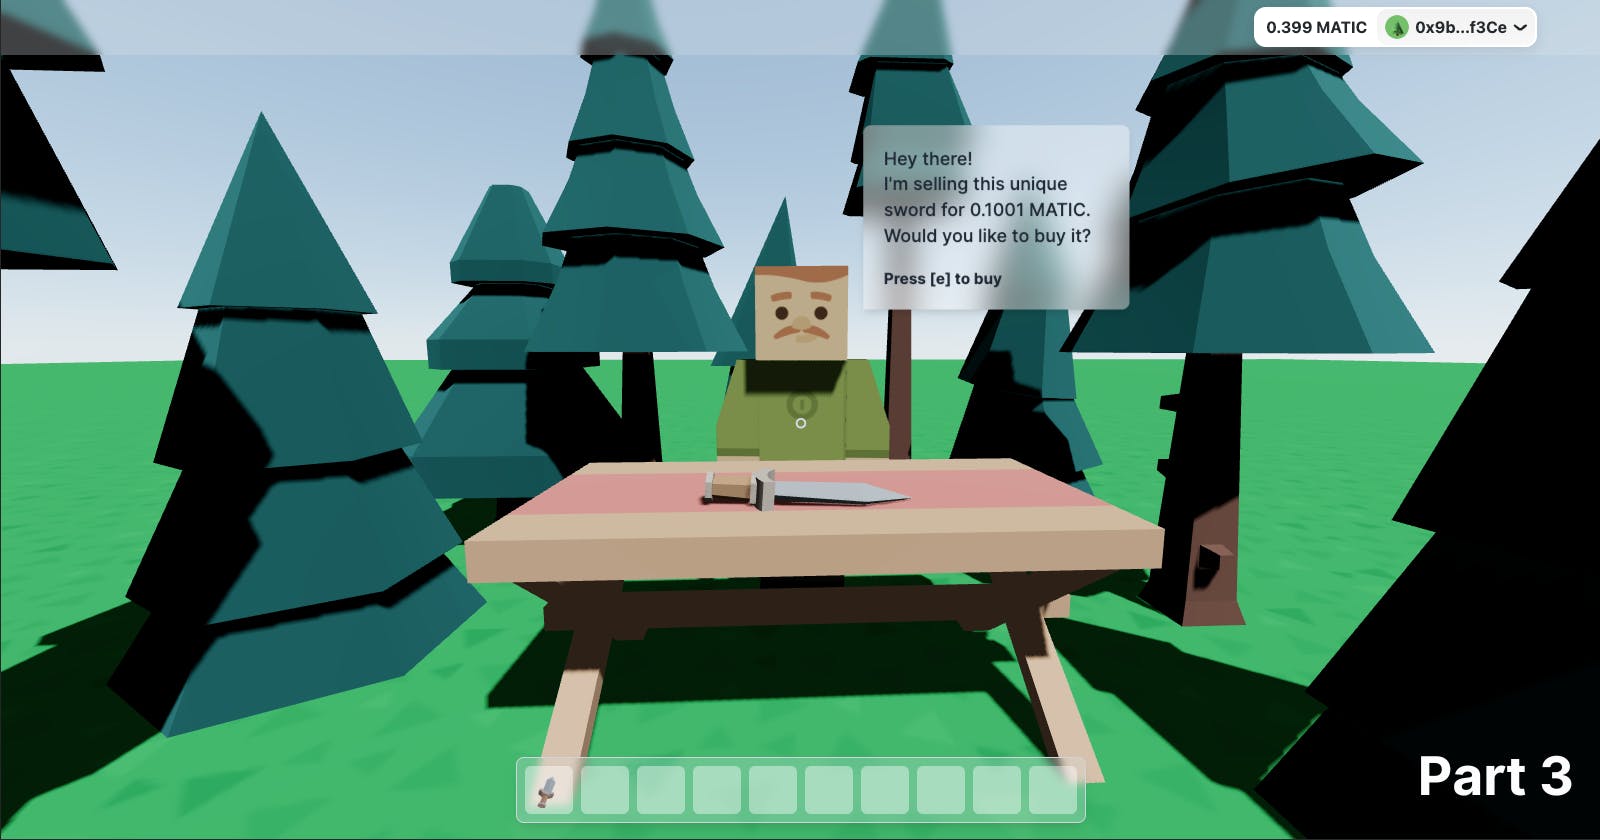
Congratulations! Minting should now be possible in your 3D world making it not just a 3D world but a true metaverse. Check your browser, approach the vendor and press the e key. The minting process should start. During minting, the player should not be able to invoke the minting function again. Thanks to the toolbar and the fetch NFTs functionality we implemented in part 2 already you should see your newly minted item pop up in the toolbar once the transaction is completed.
This is huge! We've come a long way. There is only one thing left to do which is to change what the vendor says depending on the status of the transaction to give better user feedback.
Provide user feedback according to the transaction status
Head over to SpeechBubble.tsx. Let's retrieve the transaction status in this component. Import TransactionStatus from @/hooks/useMint and add the transactionStatus as a prop to the component.
type Props = {
  position: [number, number, number];
  transactionStatus: TransactionStatus;
};

const SpeechBubble = ({ position, transactionStatus }: Props) => {
  // ...
};
Now that we have the transaction status we can render some adequate user feedback. Feel free to be creative here or just follow along if you want to get the same result as me.
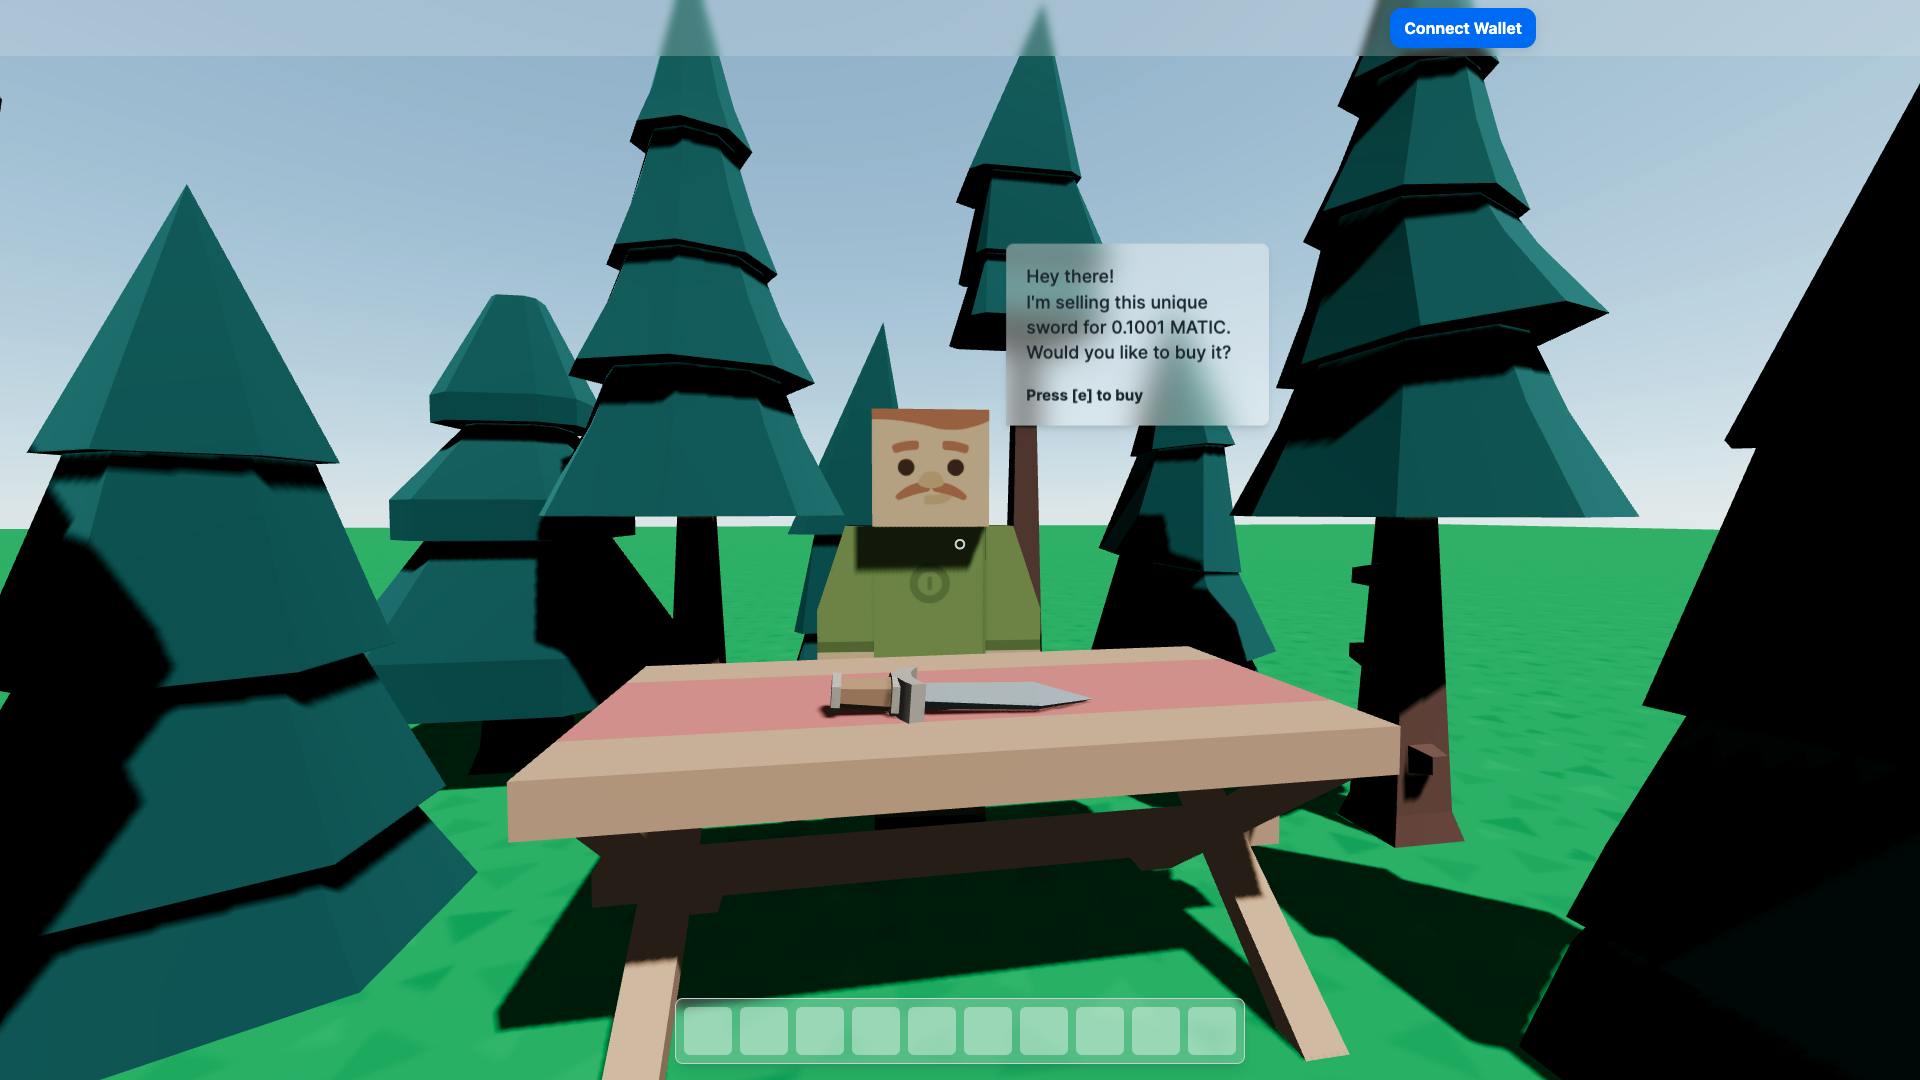
Let's set a message and optionally a note depending on the transaction status. Inside the SpeechBubble component, write:
let message: string, note: string | undefined;
switch (transactionStatus) {
  case 'idle':
    message =
      "Hey there!\nI'm selling this unique sword for 0.1001 MATIC. Would you like to buy it?";
    note = 'Press [e] to buy';
    break;
  case 'confirming':
    message = 'Great choice!\n\nPlease confirm the transaction in your wallet!';
    break;
  case 'minting':
    message = 'Your sword is currently being minted. Please wait for a moment!';
    note = 'Minting...';
    break;
  case 'error':
    message = 'Huh?\nSomething went wrong. Please try again!';
    note = 'Press [e] to retry minting';
    break;
  case 'success':
    message =
      'Hooray!\nYour newly minted NFT should appear in your toolbar any second. By clicking on it, you can also check it out on OpenSea.';
    note = 'Press [e] to mint again';
    break;
}
Then, change the HTML that is being returned from the component to use the message and the note.
return (
  <Html
    className="bg-white/40 backdrop-blur-md p-4 rounded-md rounded-bl-none shadow-md w-52 text-gray-800 text-sm"
    position={position}
    distanceFactor={4}
    wrapperClass="origin-bottom-left !z-0"
  >
    <p className="whitespace-pre-line font-medium">{message}</p>
    {note && (
      <p className="whitespace-pre-line font-bold mt-4 text-xs">{note}</p>
    )}
  </Html>
);
Lastly, head over to Vendor.tsx and pass the transaction status as a prop to the SpeechBubble component.
export const Vendor = () => {
  // ...
  return (
    <AdvancedCharacter
      scale={0.08}
      rotation={[0, -0.1, 0]}
      position={[0.7508242325314055, 0, -0.9590807472709626]}
      onPointerOver={onPointerOver}
      onPointerOut={onPointerOut}
      ref={advancedCharacterRef}
    >
      {isHovered && distanceToCamera < 3.5 && (
        <SpeechBubble position={[2.54, 21.54, 2.2]} transactionStatus={transactionStatus} />
      )}
    </AdvancedCharacter>
  );
};
You should now see the following in your browser.
Nice! One more thing: Let's let the player know that he is not connected with a wallet and that he can only buy the NFT when he is connected with a wallet.
Inside SpeechBubble.tsx import useAccount from wagmi, call the hook inside your component and conditionally render a hint telling the player that he is not connected.
const SpeechBubble = ({ position, transactionStatus }: Props) => {
  const { isConnected } = useAccount();

  // ...
  return (
    <Html
      className="bg-white/40 backdrop-blur-md p-4 rounded-md rounded-bl-none shadow-md w-52 text-gray-800 text-sm"
      position={position}
      distanceFactor={4}
      wrapperClass="origin-bottom-left !z-0"
    >
      <p className="whitespace-pre-line font-medium">{message}</p>
      {note && (
        <p className="whitespace-pre-line font-bold mt-4 text-xs">{note}</p>
      )}
      {!isConnected && (
        <p className="font-semibold text-xs text-red-400">
          You need to connect your wallet first
        </p>
      )}
    </Html>
  );
};
The entire file should now look like this:
import { TransactionStatus } from '@/hooks/useMint';
import { Html } from '@react-three/drei';
import { useAccount } from 'wagmi';

type Props = {
  position: [number, number, number];
  transactionStatus: TransactionStatus;
};

const SpeechBubble = ({ position, transactionStatus }: Props) => {
  const { isConnected } = useAccount();

  let message: string, note: string | undefined;
  switch (transactionStatus) {
    case 'idle':
      message =
        "Hey there!\nI'm selling this unique sword for 0.1001 MATIC. Would you like to buy it?";
      note = 'Press [e] to buy';
      break;
    case 'confirming':
      message =
        'Great choice!\n\nPlease confirm the transaction in your wallet!';
      break;
    case 'minting':
      message =
        'Your sword is currently being minted. Please wait for a moment!';
      note = 'Minting...';
      break;
    case 'error':
      message = 'Huh?\nSomething went wrong. Please try again!';
      note = 'Press [e] to retry minting';
      break;
    case 'success':
      message =
        'Hooray!\nYour newly minted NFT should appear in your toolbar any second. By clicking on it, you can also check it out on OpenSea.';
      note = 'Press [e] to mint again';
      break;
  }
  return (
    <Html
      className="bg-white/40 backdrop-blur-md p-4 rounded-md rounded-bl-none shadow-md w-52 text-gray-800 text-sm"
      position={position}
      distanceFactor={4}
      wrapperClass="origin-bottom-left !z-0"
    >
      <p className="whitespace-pre-line font-medium">{message}</p>
      {note && (
        <p className="whitespace-pre-line font-bold mt-4 text-xs">{note}</p>
      )}
      {!isConnected && (
        <p className="font-semibold text-xs text-red-400">
          You need to connect your wallet first
        </p>
      )}
    </Html>
  );
};

export default SpeechBubble;
The result
Congratulations if you've come so far. We've achieved a lot in this tutorial. We built a metaverse from scratch, how cool is that? Let's recap what we did:
We started by creating a 3D world with a ground, sky and floor
We implemented the functionality for player movement
We added flora, a desk and an NPC (the vendor) to the game
We made wallet connection possible
We created an NFT collection
We added the 3D NFT model stored on IPFS to the game
We added a toolbar to the metaverse displaying all NFTs the player owns
We added a conditionally displayed speech bubble to the NPC and made interaction possible
We implemented the NFT minting logic which is triggered on interaction with the NPC
We improved the user feedback regarding the transaction status by dynamically changing what the NPC has got to say
If you've coded along your result should look pretty similar to this:
You can find the whole source code as well as the link to the metaverse we created in this tutorial in the last section at the bottom of the page.
Next steps
Now that you've built a basic metaverse you could extend it. You could make it bigger, more exciting and more lively, the possibilities are endless. However, here are a few suggestions:
Make the world look less empty by adding more models
Right now the NFT doesn't have any utility. It would be nice if the player would be able to use the sword in the game, like wielding the sword and using it against NPCs.
Improve player movement by adding jumping, crouching etc.
Right now the game is single-player which is kind of boring. Try to add multi-player.
Add a dynamic day and night system
Last words
Thank you for reading until the end!
If you found this tutorial helpful please consider subscribing for more content like this. I am also planning to create a YouTube channel revolving around frontend development for the web apps of tomorrow leveraging all that Web3 has to offer. Additionally, by giving me a follow on Twitter you won't miss any announcements and short-form content.
Links
Full source code: https://github.com/JonWofr/metaverse-demo
Deployed app: https://metaverse-demo-ten.vercel.app/